Introduction
Mozzarella is a semi-soft, not-aged cheese made from stretched curd. It is normally made from whole buffalo milk or whole cow milk. Mozzarella cheese is not aged like cheddar cheese and it tastes great when it is made and consumed fresh. Mozzarella cheese can be consumed in small bites, sliced, eaten in salad, or added to pizza and pasta.
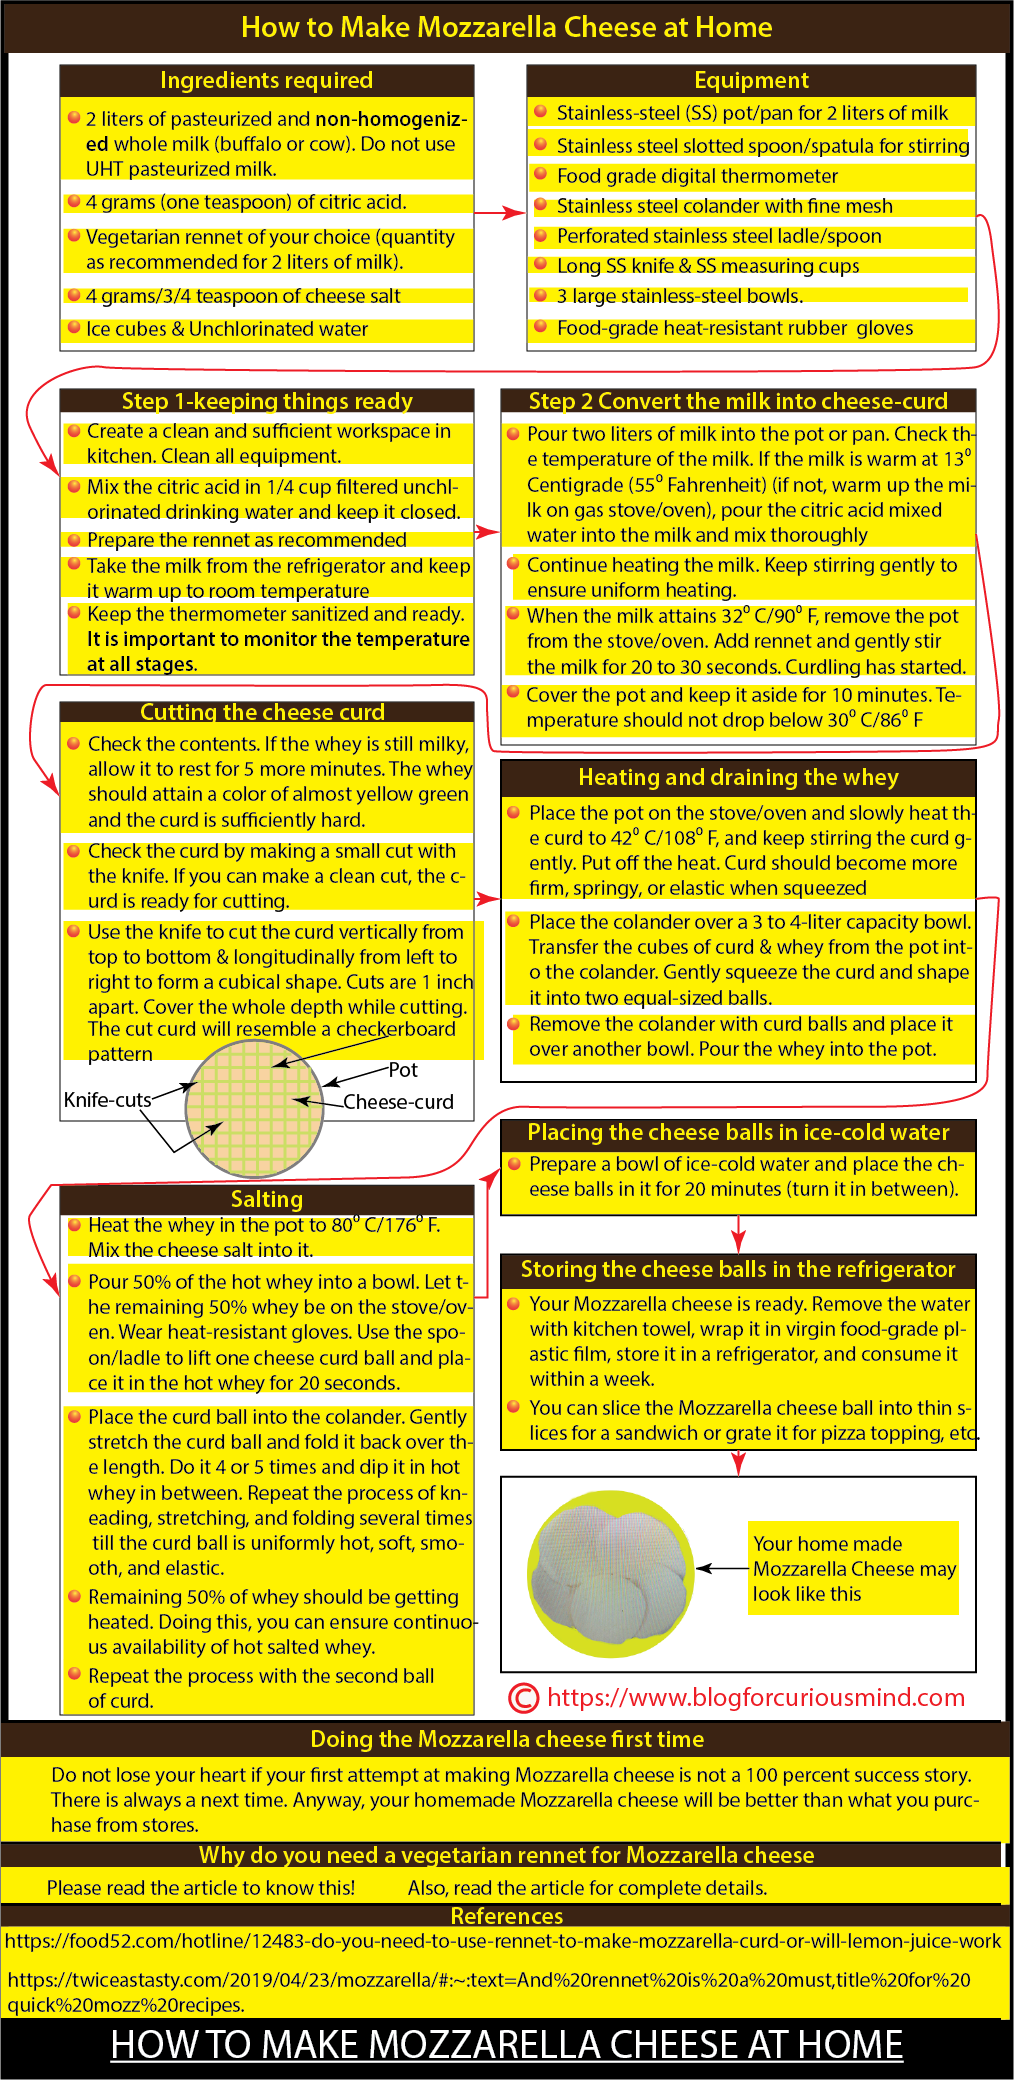
How to Make Mozzarella Cheese at Home
Ingredients required
- 2 liters of pasteurized and non-homogenized whole milk (buffalo or cow). Do not use long shelf life/tetra pack UHT pasteurized milk. If you purchase raw milk from a local vendor, boil it and place it in the refrigerator when cooled.
- 4 grams (one teaspoon) of citric acid.
- Vegetarian rennet or microbial rennet vegetarian of your choice; rennet quantity as recommended by its supplier for 2 liters of milk.
- 4 grams/3/4 teaspoon of cheese salt (cheese salt is a non-iodized salt, good quality sea salt can also be used).
- Ice cubes to prepare ice-cold water bowl
- Unchlorinated water to dilute citric acid and vegetarian rennet (as per supplier recommendation)
Equipment
- Stainless-steel pot/pan to heat 2 liters of milk.
- Stainless steel slotted spoon/spatula for stirring (it has slots or holes to drain the liquid). If you do not have it, a regular stainless-steel spoon/spatula will do.
- Food grade digital thermometer.
- Stainless steel colander with fine mesh (the colander should retain the solid curd pieces and drain out the whey). If your colander has bigger holes, line the colander with cheesecloth (cotton muslin cloth).
- Perforated stainless steel ladle/spoon for handling hot cheese balls
- Stainless steel knife long enough to cover the depth of the pot
- 3 large stainless-steel bowls.
- Food-grade heat-resistant rubber hand gloves
- SS measuring cups
Step 1-keeping things ready
- Create a clean and sufficient workspace in your kitchen.
- Clean all the equipment.
- Mix the citric acid in 1/4 cup filtered unchlorinated water and keep it closed.
- Prepare the rennet as recommended by its supplier and keep it closed.
- Take the milk from the refrigerator and keep it warm up to room temperature
- Keep the thermometer sanitized and ready. It is important to monitor the temperature at all stages.
Step 2 Convert the milk into cheese-curd
Pour two liters of milk into the pot or pan. Check the temperature of the milk. If the milk is warm at 13⁰ Centigrade (55⁰ Fahrenheit), pour the citric acid mixed water into the milk and mix thoroughly.
If the milk is still cold, place the pot of milk on a gas stove or oven and use low to medium heat to warm the milk to 13⁰ Centigrade (55⁰ Fahrenheit). Add citric acid and stir/mix completely. Continue heating the milk. Keep stirring gently and continuously with the spoon/spatula to avoid overheating of the milk at the bottom. Stirring ensures uniform heating of milk.
When the milk attains 32⁰ Centigrade (90⁰ Fahrenheit), remove the pot from the stove/oven. Ensure the temperature. Add rennet and gently stir the milk with a spoon/spatula for 20 to 30 seconds. Use up and down movement while stirring. Curdling has already started.
Cover the pot and keep it aside for 10 minutes, undisturbed. The temperature should not drop below 30⁰ Centigrade (86⁰ Fahrenheit). Keeping the pot in a warm water bowl will help to minimize the drop in temperature.
Cutting the cheese curd
Remove the cover and check the contents. If the whey is still milky, cover the pot and allow it to rest for 5 more minutes. The whey should attain a color of almost yellow green and the curd is sufficiently hard.
Check the curd again by making a small cut with the knife. If you can make a clean cut into the curd, the curd is ready for cutting.
Cut the curd vertically moving the knife from top to bottom. Start from left, make cuts 1 inch apart till you reach the right end. Cover the whole depth while cutting.
Cut the curd longitudinally moving the knife from left to right to form a cubical shape. Start at the top, make cuts 1 inch apart till you reach the bottom. Cover the whole depth while cutting.
Every cut you make should separate the curd and whey clearly. The cut curd will resemble a checkerboard pattern.
Heating and draining the whey
Place the pot on the gas stove or oven again and slowly heat the curd to 42⁰ Centigrade (108⁰ Fahrenheit), and keep stirring the curd gently with the spoon/spatula during heating. Put off the gas/oven. Do not allow the temperature to rise beyond 43⁰ Centigrade (110⁰ Fahrenheit). Use the digital thermometer to ensure temperature.
Now, the curd should become more firm, springy, or elastic when squeezed. Stirring makes the cheese curd firmer.
Place the colander over a 3 to 4-liter capacity bowl. Use the spoon/spatula to transfer the cubes of curd from the pot into the colander and pour the remaining whey with small curd pieces into the colander. The colander catches the tiny curd pieces in it. Gently squeeze the curd and shape it into two equal-sized balls.
Remove the colander with curd balls and place it over another bowl. Pour the whey into the pot that was used for heating the milk.
Salting
Heat the whey in the pot to 80⁰ Centigrade (176⁰ Fahrenheit). Use the digital thermometer to ensure temperature. Add and mix the cheese salt into it.
Pour 50% of the hot whey into a bowl. Let the remaining 50% whey be on the gas stove/oven. Wear heat-resistant food-grade rubber hand gloves. Use the slotted spoon/spatula/perforated ladle/spoon to lift one cheese curd ball and place it in the hot whey for 20 seconds.
Place the curd ball into the colander. Gently stretch the curd ball and fold it back over the length. Do it 4 or 5 times and dip it in hot whey in between (similar to kneading the dough). Repeat the process of kneading, stretching, and folding several times till the curd ball is uniformly hot, soft, smooth, and elastic. The cheese should still have some moisture in it. Dip the curd ball in hot whey in between. You can make small cheese balls from the bigger ones if desired.
Meanwhile, the remaining 50% of whey should be getting heated. By doing this you can ensure continuous availability of hot salted whey for dipping the cheese curd.
Repeat the process with the second ball of curd.
Placing the cheese balls in ice-cold water
Prepare a bowl of ice-cold water and place the cheese balls in it. Turn the cheese balls a few times and ensure it is not losing its shape. Let the cheese balls be in cold water for 20 minutes.
Placing the cheese balls in the refrigerator
Now, your Mozzarella cheese is ready. Wrap it with a kitchen paper towel to remove the water.
You can consume it now or wrap it in virgin food-grade plastic film, store it in a refrigerator, and consume it within a week.
You can slice the Mozzarella cheese ball into thin slices for a sandwich or grate it for pizza topping, etc.
Doing the Mozzarella cheese first time
Doing Mozzarella cheese the first time can be tricky. It will be good if you try your hands first on a soft cheese like paneer before attempting Mozzarella cheese. There is no need to hurry, understand every step and meticulously follow it.
Do not lose your heart if your first attempt at making Mozzarella cheese is not a 100 percent success story. There is always a next time. Anyway, your homemade Mozzarella cheese will be better than what you purchase from stores.
This and this YouTube videos may help you in getting more input on making Mozzarella cheese at home.
Why do you need a vegetarian rennet for Mozzarella cheese
Many recipes on YouTube videos show you how to make Mozzarella cheese only with a starter and the starter suggested can be citric acid, lemon juice, vinegar, etc. So, why do you need a rennet?
You can indeed coagulate the milk only with citric acid or lemon juice. But the difference is a milk coagulated with only citric acid coagulates quickly and the curd formed has a high acidity; on the other hand, milk coagulated with a bit of citric acid followed by vegetarian rennet coagulates the milk a bit slowly with a low acidity, and the cheese formed will be still sweet.
Hence, the expert’s recommendation is to use a combination of starter (like citric acid) and vegetable rennet for Mozzarella cheese. Vegetable and microbial rennet facilitates the fat units to consolidate into a protein chain and make kneading and stretching the cheese easy.
If you are making a soft cheese like paneer then only citric acid or lemon juice is sufficient, but a cheese like Mozzarella needs both starter and rennet.
Want to know more about rennet and the availability of vegetarian rennet in India, then click on rennet!
Conclusion
The advantage of home-made Mozzarella cheese is it is made in your kitchen and there is the pride of doing it with your own hands. Hope this article is helpful to you.
You may read the article ‘How Mozzarella Cheese made in Factory‘ and ‘Mozzarella Cheese Manufacturing Process‘.
References